
Trim and crown molding add elegance, character, and a polished look to any room. Whether you’re renovating or building new, these decorative elements can completely transform your space. If you’re considering installing trim or crown molding, this guide covers everything from material choices to installation tips.
Choosing Your Style & Material
1. Trim Style Options
There are several types of trim and molding to consider:
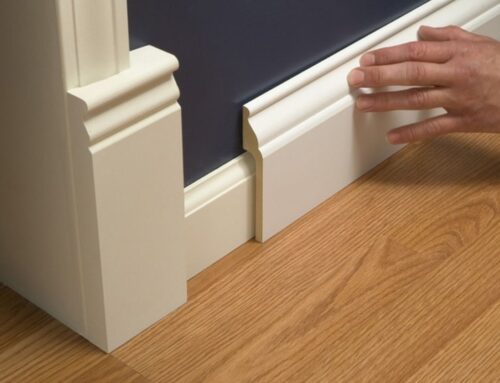
- Baseboards: Run along the bottom of your walls to provide a finished look and protect against scuffs.
- Casings: Frame your windows and doors.
- Crown Molding: Fitted where walls meet the ceiling, adding a dramatic and elegant detail.
- Chair Rails & Wainscoting: Add depth and visual structure to mid-wall areas.
2. Material Types
Trim and molding are available in a range of materials:
- Solid Wood: Durable and natural, ideal for stained finishes.
- MDF (Medium-Density Fiberboard): Cost-effective and easy to paint.
- Polyurethane or Polystyrene: Lightweight, flexible, and resistant to moisture—great for bathrooms or kitchens.
- Plaster: Often used in historic or luxury homes for detailed molding work.
If you’re aiming for a unique, upscale interior, pairing your trim with molding interior design elements can dramatically elevate the final result.
Accurate Measurements & Budget Planning
- Measure each room’s perimeter, accounting for corners and joints.
- Add 10% extra to your measurements for waste or errors.
- Keep in mind that more complex molding designs may cost more in both materials and labor.
Installation Basics
1. Wall Prep
Ensure walls are smooth and clean. Any bumps or texture can interfere with the trim’s ability to sit flush against the wall.
2. Cutting & Fitting
Precision is everything. Mitered corners, coping joints, and custom cuts all require the right tools and skill. Decorative corner blocks are an alternative that adds style and simplifies installation. For a flawless finish, hiring molding installers near me can save time and reduce costly errors.
3. Finishing Touches
Once installed, nail holes and seams should be filled and sanded. After that, trim is typically caulked, primed, and painted or stained for a clean, finished appearance.
Why Choose Purely Paint?
Installing trim and crown molding requires precision, proper tools, and finishing expertise. Our professional team ensures clean lines, flawless corners, and seamless joins. You’ll also avoid common DIY challenges like gaps, cracking, or uneven installation. Whether you’re revamping a single room or working with a painting company in Old Bethpage for a full interior upgrade, working with us makes all the difference.
Maintenance Tips
- Dust regularly with a microfiber cloth.
- Re-caulk any gaps that appear over time due to settling.
- Repaint or touch up as needed to maintain a fresh look.
Let’s Get Started!
Trim and crown molding aren’t just decorative—they define your home’s personality. Whether you prefer a modern, minimalist style or a classic, ornate look, the right installation can make all the difference.
From material selection to expert craftsmanship, choosing an expert wallpaper removal and painting team like Purely Paint ensures your home gets the high-quality detail it deserves. Call us today at (516) 835-5880 for an estimate.


Leave A Comment